Hosting a static website powered by Pelican on Amazon Web Services S3
After successfully creating a personal website as explained in my previous blogpost, we will now look into how to deploy it on Amazon Web Services and setup a CI/CD pipeline using BitBucket Pipelines.
Content
- Setting up Amazon Web Services S3
- Creating the BitBucket CI/CD pipeline
- Linking your AWS Route 53 domain to the AWS S3 Bucket
Architecture
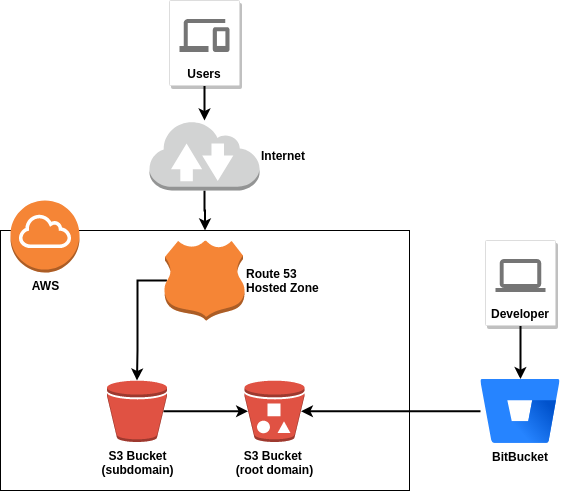
1. Setting up Amazon Web Services S3
To upload and host the static website to AWS, we need to create a storage for the content. This is easily achieved on AWS using a Simple Storage Service (S3) Bucket. Through the AWS Management Console, a bucket can be created in a matter of minutes.
We will setup two buckets, one for the root domain, i.e., pietermoens.be, and the subdomain, i.e., www.pietermoens.be. The former will contain all the content or objects while the latter will be empty and simply redirect to the root domain bucket. Go ahead and create these two buckets using the default configuration and your preferred region.

For root domain, go to "Properties => Static website hosting" and select "Use this bucket to host a website". For the subdomain, go to "Properties => Static website hosting" and select "Redirect requests" with your root domain as target bucket.
Since we will be automatically deploying our website to the root domain bucket, it requires public access to the objects. Go to "Permissions => Block public access" and edit the permissions as follows:

This is all the S3 configuration required to start deploying our website to AWS.
2. Creating the BitBucket CI/CD pipeline
In this section, our goal is to automate the deployment process by leveraging the benefits of BitBucket Pipelines. The complete pipeline is given by the bitbucket-pipelines.yml file.
The first tep in the pipeline install our requirements and builds the Pelican website based on the provided pelicanconf.py file. The artifacts created from this step are present in the output directory. The contents of this directory shall be uploaded to AWS S3.
The second step is completely powered by the AWS S3 Deploy Pipe by Atlassian. An access key can be created at the Security Credentials section of your AWS Account. They can then be provided to the BitBucket pipeline as variables. Go to "Repository Settings => Pipelines => Repository variables".
Note: In my repository, the source code is located within the "blog-resume" subdirectory.
image: python:3.7
pipelines:
  branches:
    master:
      - step:
          name: Build artifact
          script:
            - git submodule update --init --recursive
            - cd blog-resume
            - pip3 install -r requirements.txt
            - pelican -s pelicanconf.py
          artifacts:
            - blog-resume/output/**
      - step:
          name: Deploy to S3
          deployment: production
          script:
            - pipe: atlassian/aws-s3-deploy:0.4.1
              variables:
                AWS_ACCESS_KEY_ID: $AWS_ACCESS_KEY_ID
                AWS_SECRET_ACCESS_KEY: $AWS_SECRET_ACCESS_KEY
                AWS_DEFAULT_REGION: 'eu-west-3'
                S3_BUCKET: 'pietermoens.be'
                LOCAL_PATH: 'blog-resume/output'
                ACL: 'public-read'
                DELETE_FLAG: 'true'
Once our code is being committed to our BitBucket repository (master branch), the pipeline will be executed and the contents will be deployed to AWS S3.
3. Linking your AWS Route 53 domain to the AWS S3 Bucket
Finally, we will link our domain name to the buckets created in step 1. To do this, we will leverage the strengths of AWS Route 53 Hosted Zones.
Start by creating a new hosted zone for your domain name. Then create a Record Set for the root domain:
- Name - pietermoens.be
- Type - A - IPv4 address
- Alias - Yes
- Alias Target - Select your S3 website endpoint
Repeat this process for the subdomain:
- Name - www.pietermoens.be
- Type - A - IPv4 address
- Alias - Yes
- Alias Target - Select your S3 website endpoint
If your domain is hosted by an external registrar, you will need to point the domain to the AWS nameservers displayed by the 'NS' record.
After these steps, you should be able to access your brand new website by browsing to your domain! Enjoy!